What happens when a new piece of equipment, like a washing machine for instance, arrives? Apart from getting it out of its box and, more often than not, plugging it in?
Well, pretty much the same things every time. Whatever the item is, it generally arrives in a box and packaging; along with some paperwork, such as a manual, warranty/service details and an invoice; and occasionally there are parts for installation and, sometimes, spares included. All this needs a home and more often than not these are not all in the same place.
As part of my onboarding process for new equipment (yes, as far as I am concerned they are "people") I have two pages in OneNote that I set up each time something new arrives. A Reference page that holds information that won't change over time and an MRO page (Maintenance, Repair and Operations) to monitor the work that needs to be done to keep that bit of kit functional.
The term MRO originated in the aeronautical industry during or shortly after the First World War and initially stood for Maintenance, Repair and Overhaul activities. It really took off (pun intended) in the late 1930s and early '40s due to the next World War and was used for the activities involved in keeping planes in the air, everything from making sure that coolant levels were kept topped up to repairing bullet holes. It was such a useful concept that its use spread into different sectors with the abbreviation often changing to O for Operations rather than Overhaul.
Not one to pass over a good idea I have adopted it for household use. Its use isn't restricted to complex items either, there is nothing to stop you using it for simple inanimate stuff, even a brick wall periodically needs some care and attention after all.
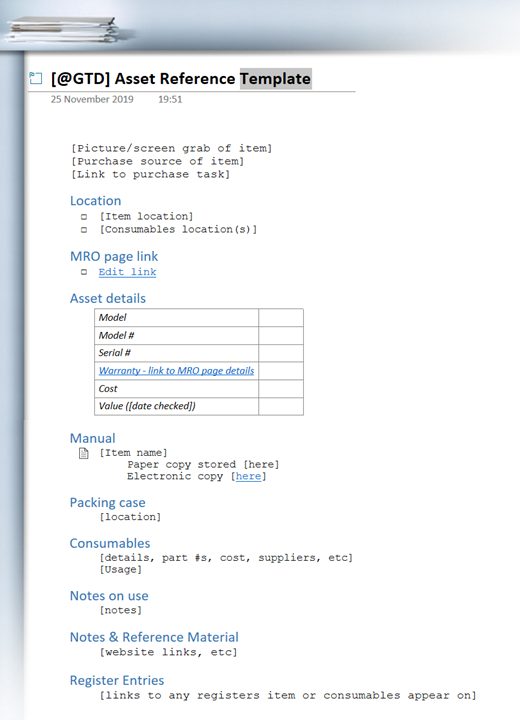
Returning to the first of the two pages, the Reference page (below). Anything in square brackets is to be written over with the specifics for that piece of kit.
 |
| Reference OneNote template |
Stepping through the page; the title is obvious, for the washing machine Asset Reference Template will be changed to Beko Washing Machine Reference and the [@GTD] is a tag for internal use to denote where the item is located or what project or process it is part of.
The first fields to fill in are a picture of the item (helpful when you are trying to find one laptop or tablet out of a few different choices), where it was bought from and a link to any notes on that purchase task. Then comes the Location of both the kit and anything needed to use it or keep it running. The link to the MRO page we'll come onto later.
Next are the Details of the kit, having things like the model number and warranty details to hand means not having to search around for pieces of paper or drag stuff out to look at the faceplate on the rear of a machine. Knowing the locations of the paper and electronic copies of the manual also saves time. The paper copies are stored in clear A4 wallets, or punched pockets, organised in manila folders labelled by room. Where you put the packing case, if kept, is easier to write down when you are storing it than trying to remember where you stuffed the box for "just in case I need it later" purposes.
For ease of use details of the required Consumables and their resupply are recorded next. Obviously for a washing machine you probably aren't going to do this for the washing powder but you might for a descaler or cleaner that you use only infrequently. Equally, short notes on how and how often they might be used are also useful. The location of any supplied spares or installation parts are noted here and they are kept together in a small box or ziplock bag if they will be needed on an ongoing basis or thrown into the original box for storage if they aren't.
Finally any useful links or information on how to use the item and general information about it can be recorded. The Register Entries section is for links to any lists that the kit might appear on, say home maintenance contracts or an IP table if the kit is Wi-Fi enabled. I have a spreadsheet for tools, mostly to stop me rebuying them when I mislocate them…
The second page is the MRO page. OMR really, but that doesn't roll of the tongue quite as nicely.
 |
| MRO OneNote template |
This form is laid out slightly differently than the Reference page as is it is a live document. I borrowed the layout from from an on-line template on the Microsoft OneNote support pages that are now long gone (cheers to whoever set up this template initially, jeers to Microsoft for slowly throttling OneNote) and adapted it to fit my needs. As before the title is self-explanatory; the Outcome statement is a hangover from the original template and you can see that the link back to the Reference page combines with the link from the Reference page to this MRO page ensuring that the two are cross-referenced.
The Actions required fall into three groups, Operations, Maintenance and Repair. Operational actions are anything that needs to be performed when the machine is in use. For the washing machine this is really only ensuring that enough cleaning supplies are to hand as power and water supplies are hard-linked. For something else, like a car, for instance, things like periodic checks of tyre pressure, oil, screen wash, etc. would fall into this category. For each task there is an entry for the repeat frequency of the task, ie how often it has to be done, when it was last done and when it is next due. OneNote is quite a nice way to monitor this as the individual rows on the tables can be dragged up and down the table so you can order it by whatever task is due next.
Maintenance actions are those that need to be performed to keep the machine running, ie operational. For the washing machine these are things like, checking the input water filters once a year or descaling the system periodically. For a car it would be annual service visits to the garage, oil changes, etc. Again the table has entries for frequency and dates in the same manner as the Operations section.
The Repair section is laid out slightly differently as these actions are only taken when there is a specific problem to be corrected that, hopefully, should not reoccur. The Task heading is simply a note of the issue to be attended to and Next action is what needs to be done next to remedy it, as most repairs will often take more than one step to fix. If the repair is anything more than a simple 10 min job I will often link out from the task to another OneNote page. For the washing machine it attracted two repair tasks initially, replacing the foot that was missing when it arrived and cleaning the inside of the machine due to a soap overload. For a car you are talking about anything from fixing a blown bulb to body work repairs. Start and Complete dates are the times from when the problem was first noted to when it was resolved.
As each of these types of actions are completed I note the date and what was done in the Actions Taken section and over time this builds up into what is essentially a service history for the piece of kit. Underneath each table in the Actions section there is space to write short notes on how to accomplish routine actions or what the progress of a repair is. If these get too large, for routine actions they can be moved to the Notes & Reference section, for repairs I usually link out to another OneNote page as noted above. At the end of the Actions section there are a few headings for information that is useful to have on the page, even though some of this is replicated on the Reference page. As the information is added they often end up in the Notes & Reference section.
Below are links to the OneNote templates. To use them simply right-click to open them in OneNote. They will appear in your OneNote notebooks list in Open Sections. You can simply move them into an open Notebook and copy-and-paste as required. To save them as a page template choose Insert>Page Templates and select Save current page as a template from the Templates side-bar that opens up. If you find them useful or can suggest improvements let me know.
JOB DONE
Time: Years of experience.
Cost: Years of experience.